The Course Wizard is the preferred method for uploading new courses. To access it, go to Resources > Course Import Wizard in the Administrator's Console or click on the Add or Update a New Course icon in the Administrator home page.
The course import template must be used when creating new 3rd party courses or other non-eLearning courses. The template is also useful for uploading courses (both eLearning and non-eLearning) that are needed only for historical purposes.
The template should follow this format:
|
Column |
Header |
Description |
|---|---|---|
|
A |
Course Name |
Required
|
|
B |
Course ID |
Optional
|
|
C |
Short Description |
Optional
|
|
D |
Long Description |
Required
|
|
E |
Course Objectives |
Optional
|
|
F |
Keywords |
Optional
|
|
G |
Active |
Required
|
|
H |
Estimated Time |
Required
|
|
I |
Estimated Time (text) |
Required
|
|
J |
Provider |
Required
|
|
K |
Recommendations |
Optional
|
|
L |
System Requirements |
Optional
|
|
M |
Media Type |
Required
|
|
N |
Score Model |
Required Enter one of the following values to define when the course should be marked complete:
|
|
O |
Course Type |
Optional Enter the Course Type ID. Options are:
|
|
P |
Launch URL |
Optional Enter the launch URL. This is typically only applicable when creating 3rd party courses. |
|
Q |
Audience Description |
Optional
|
|
R |
Price |
Optional Enter the participant cost for the course. Cost must be entered in the following format: 1.00 |
|
S |
Compliance/ Standards Model |
Required Enter the compliance model for this course. Options are:
|
In the template there are fields for the course provider ID and the media type ID. Both of these ID numbers are different for each and every system, so the easiest way to find these numbers for your system is to create an ad hoc report.
To create this report, go to Data Source: Course Catalog > Learning Resources in the Administrator menu. The columns for the report should include:
The provider IDs can also be found on the Maintain Providers screen, listed under Tools on the Administrator menu.
Once the template is complete, follow these steps to upload the courses into your system.
Open Course Import Wizard and select the option, “Load new course/ courses”. On the next screen, select the option “Import Courses from Excel/ Clipboard” and click Next.
If you have created your template in the standard Excel format, select “Tab” (default) as the Separator type.
On the next screen, you will be pasting the data from Excel. If you are going to include the header row, leave the box checked indicating this. If the header row will not be included, uncheck this box.
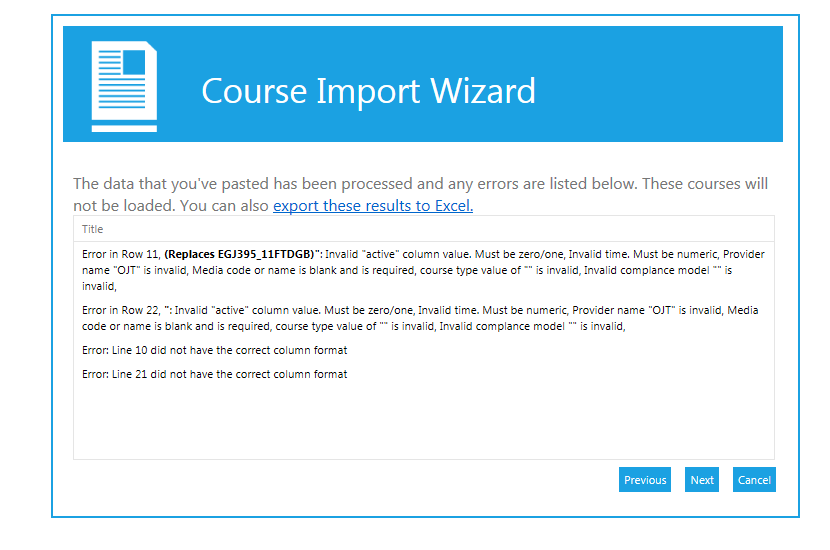
If any information was entered incorrectly or if required information is missing, the wizard will alert you to this fact. Common Errors include: Incorrect information, missing required information, and data in the wrong format.
If necessary, click the Previous button to return to the previous screen. Make any necessary corrections to the upload and then paste it again. When all of the information on the upload is correct, you will see a confirmation screen.
On the next screen, you can select the appropriate import option based on the data in your course upload. You can choose either “Import New Courses Only” or “Update Existing Courses/Import New Courses.”
If you would like to set the Primary audience for this course using an Audience Template, you can select the template on the next screen and then check the “Link to Template” box. If not, skip the Audience Template section.
The system will confirm the number of courses that you are about to upload. Click Next to complete the upload.
There is a final confirmation screen letting you know that the upload was successful. Click Finish to close the Wizard.
Once the upload is complete, you may want to go to Maintain Learning Resources to set the audience and any other additional information about the course.